How To Design Perforated Notebook Pages That Tear Out Cleanly
Leave a message
Perforated notebook pages look simple because the finished feature is only a line. In production, that line changes the usable sheet size, the relationship between artwork and binding, the strength of the retained page, and the way a user removes the sheet. A perforation that is placed from a screen mock-up alone can create a page that tears into the punch holes, leaves an awkwardly narrow writing area, or removes cleanly on one side of the notebook but not the other.
The practical way to design tear-out pages is to treat them as a small mechanical system. Start with the finished notebook and the way the removable page will be used. Then define what remains attached, what comes out, where the binding hardware sits, and what the physical proof must demonstrate before production is released.
Start With the Removable Object, Not the Perforation Line
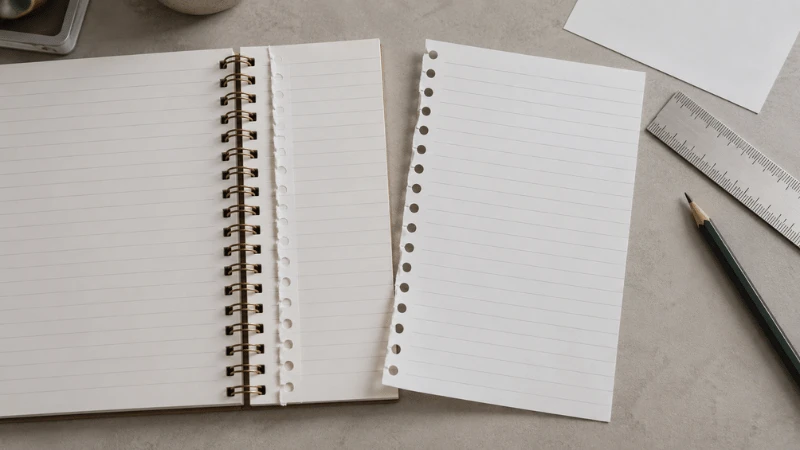
Before choosing a perforation style, define what the user is supposed to hold after the page is removed. A shopping list, meeting note, sketch, form, coupon or detachable reference sheet may all need different final proportions.
This changes the design question. Instead of asking, "How far from the spine should the perforation be?" ask, "What size and edge condition should the removed sheet have, and what must remain in the notebook after removal?"
| Decision | Question to answer | Why it matters |
|---|---|---|
| Removed sheet | What usable width and height must remain after tearing? | The tear line becomes a real trim edge for the user. |
| Retained strip | Will a narrow stub stay inside the binding? | It must survive page turning without interfering with the binding. |
| Removal frequency | Are all pages removable or only a section? | This affects navigation, page count, thickness and user expectations. |
| Content mapping | Does important content cross the tear line? | Artwork has to work both before and after the sheet is removed. |
| Binding system | Where are the holes, wire or coil relative to the tear line? | The perforation cannot be treated independently of the bound edge. |
Map Four Edges Before You Place the Tear Line
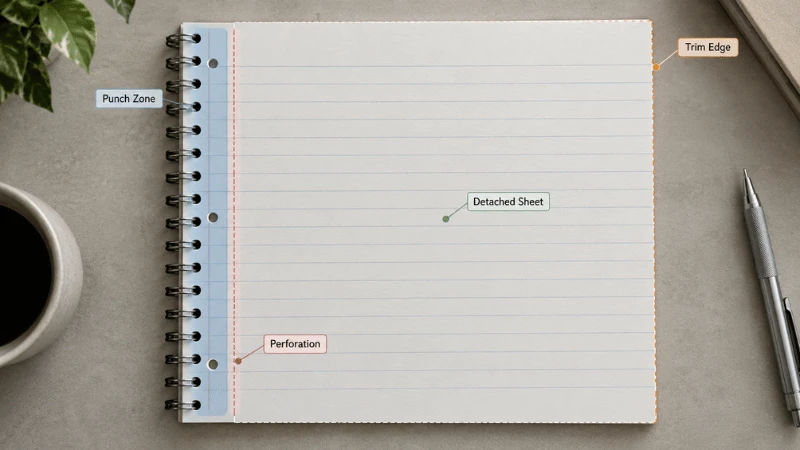
A useful production drawing should distinguish four different boundaries: the finished trim edge, the binding or punch zone, the perforation, and the final edge of the removed sheet. They may look close together on a small notebook, but they have different jobs.
The punch zone belongs to the binding system. The perforation belongs to the removable-page function. The writing field belongs to the user. If those three are collapsed into one generic "inner margin," one change can quietly damage another part of the design.
For spiral or Wire-O notebooks, the perforation should be reviewed on the real punched sheet. Hole position, hole size, pitch, binding diameter, cover stiffness and the amount of material left between the punch and tear line all affect how the retained strip behaves. There is no responsible universal number that can replace that check.
This is also why a perforated interior should be developed beside the broader notebook material and construction decisions, not as a late artwork instruction.
Decide Whether the Tear Line Creates a Stub
Many bound tear-out pages leave a narrow strip inside the notebook after the main sheet is removed. That strip can be useful because the binding holes remain untouched. It can also become a problem if it is too weak, curls into the binding, catches neighboring pages, or creates a visibly untidy block after many sheets have been removed.
Evaluate the retained strip as a component of the finished book. Turn pages with several sheets already removed. Fold the covers back if the intended notebook is designed for that behavior. Check whether loose stubs migrate toward the coil or wire. A construction that looks neat before the first tear may look very different after twenty.
For products where a visible stub is undesirable, the project may require a different page architecture or binding approach. That is a product decision, not something to hide with a narrower line in the artwork.
Perforation Strength Is a Trade-Off, Not a Quality Score
A tear line has to do two opposite things. It must hold together during printing, punching, binding, packing and normal page turning, but it must also release when the user deliberately removes the sheet.
Making the perforation "easier" is not automatically better. If the connection becomes too weak, pages can start separating during handling. Making it "stronger" is not automatically better either; a user may pull hard enough to distort the sheet, tear into the printed area or stress the retained strip.
The relevant variables include the paper itself, the cut-to-tie pattern of the perforation, the direction and speed of the tear, and how much sheet remains around the line. Those variables should be judged together on the intended stock. A digital proof can confirm position, but it cannot prove tear behavior.
Design the Page in Two States: Before and After Removal
Perforated pages need two layouts at once. The first is the page as it appears while bound. The second is the detached sheet after the user removes it.
That distinction becomes important when the page includes rules, grids, headers, checkboxes, illustrations, folios, QR codes or branded elements. A line that looks centered in the bound notebook can leave the detached sheet visually unbalanced. A footer that sits comfortably near the notebook edge may end up too close to the new torn edge.
For duplex pages, front and back must be mapped as a pair. The tear line does not move when the sheet is turned over, but left/right visual relationships do. A form that is correct on a right-hand page can become confusing on the reverse if the designer treats the second side as a mirrored screenshot rather than the back of a physical sheet.
The safest artwork review therefore includes a small physical mock-up even before the production sample: print both sides, fold or mark the binding edge, tear along the intended line and inspect the detached sheet in the user's hand.
Keep Critical Content Away From Both Failure Edges
A perforated notebook page has two areas where critical content should be treated cautiously: the bound edge and the tear edge. The first is affected by punching and binding. The second is affected by separation and edge roughness.
This does not mean adding a large blank band by default. It means defining a project-specific no-critical-content zone around each mechanical operation. Important text, small checkboxes, barcodes, page numbers or alignment-sensitive graphics should not depend on a perfect tear exactly on the mathematical centerline.
The broader problem of punch-safe writing fields belongs to general notebook interior layout. Perforated pages add a different requirement: the detached sheet needs its own safe composition after tearing.
Do Not Approve Perforation From One Perfect Tear
A single clean tear proves that one sheet can work. It does not prove that the feature is comfortable or repeatable in the finished notebook.
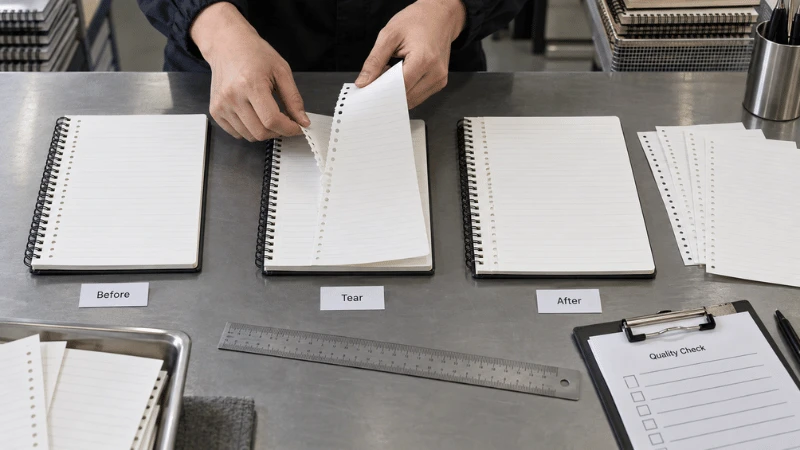
A useful sample check should include several removals from different positions in the book. Tear a page near the front, one near the middle and one near the back. Repeat the motion with the notebook lying flat and, if relevant, while it is held in the hand. The goal is not to invent a laboratory standard; it is to reveal whether the user has to compensate for the construction.
| Sample check | What to observe | Decision it supports |
|---|---|---|
| Page turning before removal | Premature separation, catching or buckling | Is the line stable in normal use? |
| Controlled tear | Start behavior, propagation and final edge | Does the sheet release predictably? |
| Retained strip | Curling, loose fibres, contact with binding | Does the notebook stay tidy after removal? |
| Detached sheet | Usable size, content balance and edge condition | Does the removed page still work as intended? |
| Repeated removals | Change in page block behavior | Does the notebook still turn and close acceptably? |
Partial-Section Perforation Needs Navigation
If only some pages are removable, the user should be able to understand that without discovering it accidentally. A planner may reserve a tear-out section for lists. A meeting notebook may use detachable action sheets. A travel journal may include removable cards or notes at the back.
The product architecture should make that boundary legible. Options include a section opener, different page furniture, a tab, a small icon or a change in ruling. The purpose is not decoration; it is to tell the user that the page behaves differently.
This is also a production control. If the perforation belongs only to a defined signature or page sequence, the pagination and collation plan should identify it explicitly. "Perforate the last few pages" is too vague for a controlled handoff.
Write the Specification Around the Finished Notebook
A practical perforated-page brief should identify the finished size, binding system, removable-page purpose, pages or sections affected, intended detached-sheet size, artwork mapping and the physical sample checks required for approval.
It should also state which dimensions are provisional until the actual punch and binding geometry are confirmed. This matters because a change in binding system, page size or cover construction can change the available space near the spine even when the interior artwork file has not changed.
When the project is a custom retail notebook, the commercial specification still belongs with the finished notebook program. The job of this guide is narrower: make the removable-page function buildable and testable before it reaches that commercial handoff.
The Approval Rule: Tear the Real Book, Not the PDF
Perforated notebook pages are successful when the mechanical feature disappears into the user's task. The page should stay attached while it is being used, release when deliberately removed, leave the notebook orderly, and remain useful after it becomes a loose sheet.
That outcome cannot be approved from a line on artwork alone. Confirm the layout digitally, then prove the feature on the intended paper inside the intended binding. If the page only works when the user learns a special tearing technique, the specification is not finished yet.